Akuafoil
Make your printing "pop out"!
It is a metallic foil laid down into images and graphics. Foil and ink merge seamlessly to create beautiful effects and tremendous control. You can specify exactly which areas of your marketing piece you want to to have the colored foil, perfectly registered every time. The foil goes down first and then ink goes on top of it.
Hint: To really make the colors work well, use a dark background.
Setting up art
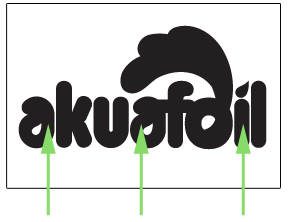
You must include a mask file along with your CMYK file. The mask file indicates where the foil will be placed. The file process is the same as spot UV—100% K where foil is placed, 0% where the foil is not placed.
As shown here, the file on top is the normal CMYK print file. If you want the logo to be Akuafoil, then your mask file should look like the file below it. The White indicates no foil and 100% K indicates where the Akuafoil will be.
Design Tips
Make sure the mask and CMYK print file are aligned and match up properly.
Akuafoil works best on lighter colors. The darker the CMYK color, the less the Akuafoil look.
Do not use very thin or small text and artwork.. Use san serif fonts above 12 point for best results.
If you would like only silver Akuafoil to print, make sure to have at least 15% K in that white area. White in the CMYK file that is 100% K in the file will appear as plain silver Akuafoil. However, for a higher quality plain silver, we recommend to have at least 15% K in that white area.
KNOCKOUTS. WARNING!
When creating knockouts in the Akuafoil mask or in the CMYK print file, beware there might be a “Halo” of white around the knockout area.
To prevent this, grow/stroke the Akuafoil area in the mask by 1–2 pixels. This will allow the Akuafoil to bleed into the CMYK area, reducing the white “Halo” effect. You can also fill in the knockout with a color to reduce the effect further.


